머리말
저번 포스트에서 Kingfisher의 주요 기능에 대해서 알아볼 것이라고 했죠!ㅎ 그래서 README의 Features와 Cheat sheat를 바탕으로 관련이 있다 싶은 것들을 포스팅하겠습니다! 근데 좀 많네요… 일단 써보고 너무 많다 싶으면 여러개의 포스트로 나누겠습니다…ㅎ
주요 기능
Kingfisher의 README에 적혀있는 주요 기능은 다음과 같습니다.
- Asynchronous image downloading and caching.
- Loading image from either
URLSession-based networking or local provided data.- Useful image processors and filters provided.
- Multiple-layer hybrid cache for both memory and disk.
- Fine control on cache behavior. Customizable expiration date and size limit.
- Cancelable downloading and auto-reusing previous downloaded content to improve performance.
- Independent components. Use the downloader, caching system and image processors separately as you need.
- Prefetching images and showing them from cache to boost your app.
- View extensions for
UIImageView,NSImageView,NSButtonandUIButtonto directly set an image from a URL.- Built-in transition animation when setting images.
- Customizable placeholder and indicator while loading images.
- Extensible image processing and image format easily.
- SwiftUI support.
이제부터 이 기능들을 하나하나 알아볼 텐데요… 제가 할 수 있겠죠?ㅎㅎ
1. Asynchronous image downloading and caching
비동기적으로 이미지를 다운로드 하고 캐싱한다는 뜻인데요, 이는 너무나도 당연하게 들릴 수 있지만, 사실은 어마어마하게 유용하고 대단한 것입니다(?). 왜냐하면, 이미지를 다운로드하거나 캐싱하는 작업을 동기적으로 수행한다는 뜻은 다운로드나 캐싱이 끝날 때까지 기다린다는 말과 같습니다. 즉 모든 다운로드나 캐싱이 끝날 때 까지 아무것도 못한다는 것이죠!
하지만 동기적으로 실행하는 경우도 있다고 합니다. 바로 이미지가 깜빡이는 것을 방지할 때입니다. KingfisherOptionsInfoItem 의 loadDiskFileSynchronously 옵션을 활성화 하고, 캐싱된 이미지가 디스크에만 있을 때 활용 가능합니다. 즉 디스크에 캐싱된 이미지를 동기적으로 불러온다는 뜻입니다.
참고로
위와 같이
loadDiskFileSynchronously옵션을 활성화 할 수 있습니당~
무슨 말일까요? 일단 보시죠~

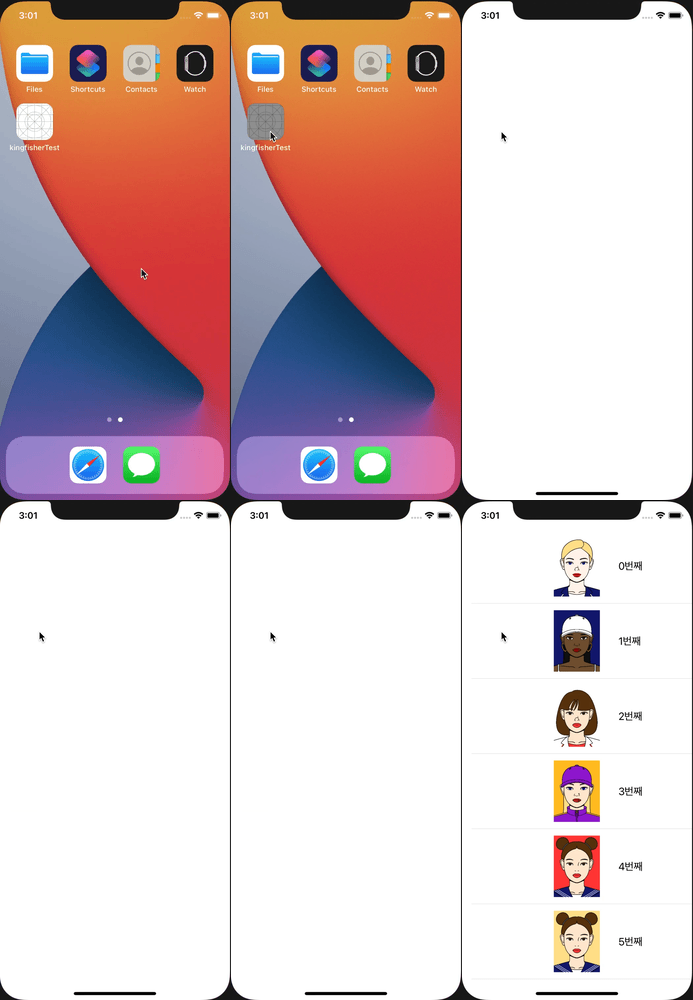
이건 loadDiskFileSynchronously 옵션을 활성화했을 때입니다.

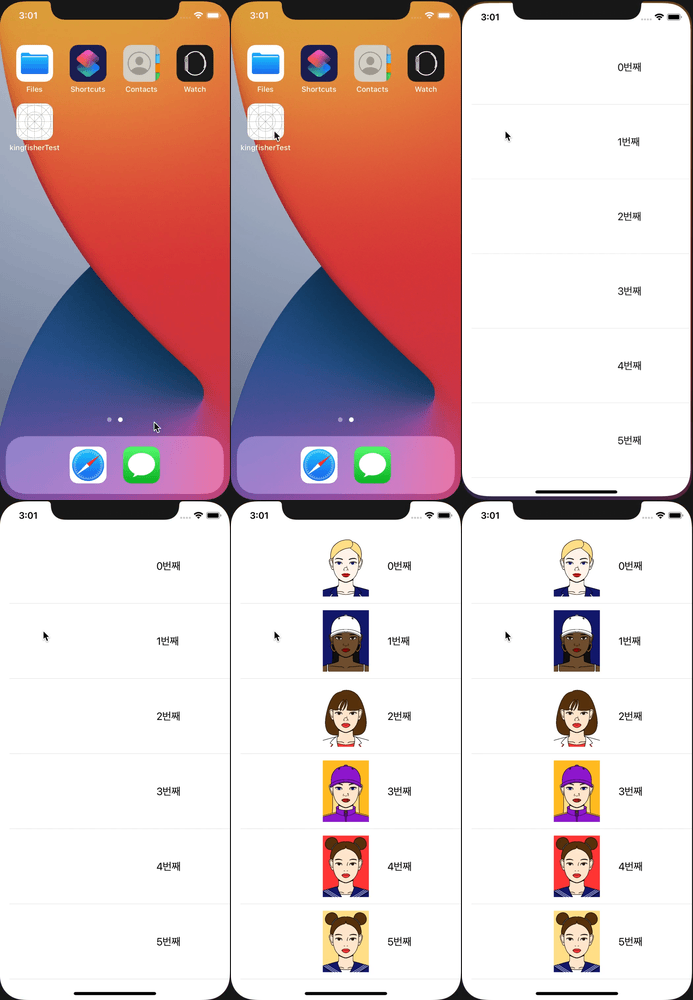
이건 loadDiskFileSynchronously 옵션을 비활성화했을 때에요.
둘의 차이를 아시겠나요? 네 그렇습니다. 첫 번째는 이미지를 캐시에서 불러오고, UIImageView에 설정하는 과정을 기다리기 때문에 모든 이미지 처리가 끝난 후에 UITableView가 보이는 것이고, 두 번째는 이미지를 요청하고 바로 넘어가기 때문에 UILabel들이 먼저 보이고, 비동기적으로 받아온 이미지가 UIImageView에 들어가게 되는 것입니다.
그런데 안 깜빡이는데요?
이미지의 크기가 작고 적어서 잘 티가 안 나지만 아마도 이미지를 비동기적으로 받아오면 cell의 순서대로 이미지가 도착하는 것이 아니기 때문에 그것을 깜빡인다고 표현한 것 같아요….
흠… 저는 깜빡이더라도 이미지를 제외한 다른 요소들을 먼저 보여주는 것이 더 나아 보이네요.
2. Loading image from either URLSession-based networking or local provided data.
Kingfisher는 URLSession 기반 네트워킹이나 local에서 제공된 데이터로부터 이미지를 받아옵니다. 네… 그렇습니다. 그렇다네요… 너무 어려운 말 같은데 그럼 이미지를 받아오는 부분 부터 생각해 볼까요?
Kingfisher에서 이미지를 받아올 때 보통 setImage(with resource: Resource?) 메소드를 사용해서 받아오는데, Resource는 무엇일까요?
1
2
3
4
5
6
7
8
public protocol Resource {

    /// The key used in cache.
    var cacheKey: String { get }

    /// The target image URL.
    var downloadURL: URL { get }
}
Resource는 protocol입니다. 캐시에서 원하는 이미지를 찾기 위한 cacheKey(URL이라면 absoluteString이 될 것입니다.)와 이미지를 다운로드 받을 수 있는 downloadURL로 이루어져 있습니다. 이 Resource protocol을 준수하는 객체를 매개변수로 넘기면 Kingfisher가 네트워크에서 받아올지 로컬에서 받아올지를 결정하는 것입니다.ㅎㅎ
그렇다면 Kingfisher는 어떻게 이미지를 네트워크에서 받아올지 로컬에서 받아올지 알 수 있는 걸까요? 바로 Kingfisher에서 제공하는 Source라는 enum과 연관 있습니다. Source는 network(Resource)와 provider(ImageDataProvider)라는 내부 케이스를 가지고 있습니다. 그래서 매개변수로 넘어온 Source 타입을 보고 네트워크에서 받아올지 로컬에서 받아올지를 결정하는 것입니다.
그런데 저는 setImage 메소드를 실행할 때
Resourceprotocol을 준수하는 객체를 보냈는데 어떻게Source로 변환이 되나요?바로
Resourceprotocol의 기본구현에 있는convertToSource() -> Source메소드와 관련이 있습니다! 이 메소드는Resourceprotocol을 준수하는 객체의downloadURL(URL타입입니다.)이 fileURL이라면provider(ImageDataProvider)를 반환해주고, fileURL이 아니라면network(Resource)를 반환해줍니다.
더 자세히 설명하고 싶지만 너무 많아서 다음에 따로 포스팅을 하겠습니다ㅎㅎ
일단은 ‘아 Resource protocol의 기본구현 메소드로 fileURL인지 아닌지 구분하고, 그에 맞게 Source의 내부 케이스로 변환해서 이미지를 로컬에서 받아올지 네트워크에서 받아올지 결정하는구나!’라고 알고 있을게요…..
3. Useful image processors and filters provided.
기본으로 제공되는 유용한 이미지 프로세서와 필터들이 있습니다. 여기서 processor는 이미지를 transition 해주는 역할을 합니다. 받아온 이미지를 별도의 처리를 통해 가공하는 것입니다. 네 역시 글자로 보니까 모르겠네요. 적용해봅시다ㅎ

이렇게 귀여웠던 스티치가

더 귀여워졌습니다.
RoundCornerImageProcessor를 사용했는데요, 이름에서 알 수 있듯이 이미지의 모서리를 둥글게 깎아주는 역할을 하는 processor 같네요.
1
2
let processor = RoundCornerImageProcessor(cornerRadius: 200)
imageView.kf.setImage(with: URL(string: "sample.com"), options: [.processor(processor)])
RoundCornerImageProcessor의 생성자로 얼마나 동그랗게 할 건지에 대한 값을 정해주고, options에 매개변수로 넣어주면 설정됩니다! 정말 간단하네요!
이 외에도 여러 가지 processor들이 기본으로 구현이 되어있어서 이미지 처리를 할 때 정말 수월할 것 같습니다. 아래는 기본으로 제공되는 processor들의 사용 방법입니다.
1
2
3
4
5
6
7
8
9
10
11
12
13
14
15
16
17
18
19
20
21
22
23
24
25
26
27
28
29
30
31
32
// Round corner
let processor = RoundCornerImageProcessor(cornerRadius: 20)

// Downsampling
let processor = DownsamplingImageProcessor(size: CGSize(width: 100, height: 100))

// Cropping
let processor = CroppingImageProcessor(size: CGSize(width: 100, height: 100), anchor: CGPoint(x: 0.5, y: 0.5))

// Blur
let processor = BlurImageProcessor(blurRadius: 5.0)

// Overlay with a color & fraction
let processor = OverlayImageProcessor(overlay: .red, fraction: 0.7)

// Tint with a color
let processor = TintImageProcessor(tint: .blue)

// Adjust color
let processor = ColorControlsProcessor(brightness: 1.0, contrast: 0.7, saturation: 1.1, inputEV: 0.7)

// Black & White
let processor = BlackWhiteProcessor()

// Blend (iOS)
let processor = BlendImageProcessor(blendMode: .darken, alpha: 1.0, backgroundColor: .lightGray)

// Compositing
let processor = CompositingImageProcessor(compositingOperation: .darken, alpha: 1.0, backgroundColor: .lightGray)

// Use the process in view extension methods.
imageView.kf.setImage(with: url, options: [.processor(processor)])
그리고, 아래처럼 한 번에 여러 개의 processor를 적용할 수도 있습니다. 아래의 경우는 먼저 이미지를 블러 처리하고, 모서리를 둥글게 만들어 줬습니다.
1
2
3
// First blur the image, then make it round cornered.
let processor = BlurImageProcessor(blurRadius: 4) >> RoundCornerImageProcessor(cornerRadius: 20)
imageView.kf.setImage(with: url, options: [.processor(processor)])
우선은 3가지 기능을 알아봤습니다. 흠…. 쉽게 생각했는데 생각보다 어렵네요. 그래도 계속 라이브러리를 까보고, 타고 타고 들어가면서 구현을 살펴보니 재미있기도 하네요?ㅎ 다음 포스트에서는 아래의 기능을 알아보고, 더 포스팅 할 수 있으면 더 해보겠습니다. 그럼 이만ㅎ
- Multiple-layer hybrid cache for both memory and disk.
- Fine control on cache behavior. Customizable expiration date and size limit.
- Cancelable downloading and auto-reusing previous downloaded content to improve performance.
- Independent components. Use the downloader, caching system and image processors separately as you need.
이 글은 개린이의 지식을 바탕으로 작성된 글입니다. 최대한 옳은 정보를 담으려고 노력하겠으나, 그럼에도 틀린 부분이 있을 수 있습니다. 혹여 발견하시면 댓글로 피드백 주시면 감사하겠습니다.
개린이의 관점에서 Kingfisher 살펴보기 시리즈